Almost everyone setting up a home lab dabbles in Jellyfin or Plex to build a media server. On the music side, you may use Navidrome, moOde, or piCorePlayer to manage your favorite albums. But what about the video games you play on your computer? Like me, you would want to share the joy of playing a few games with your family or friends. However, it’s not easy to share games through conventional digital game distribution platforms.
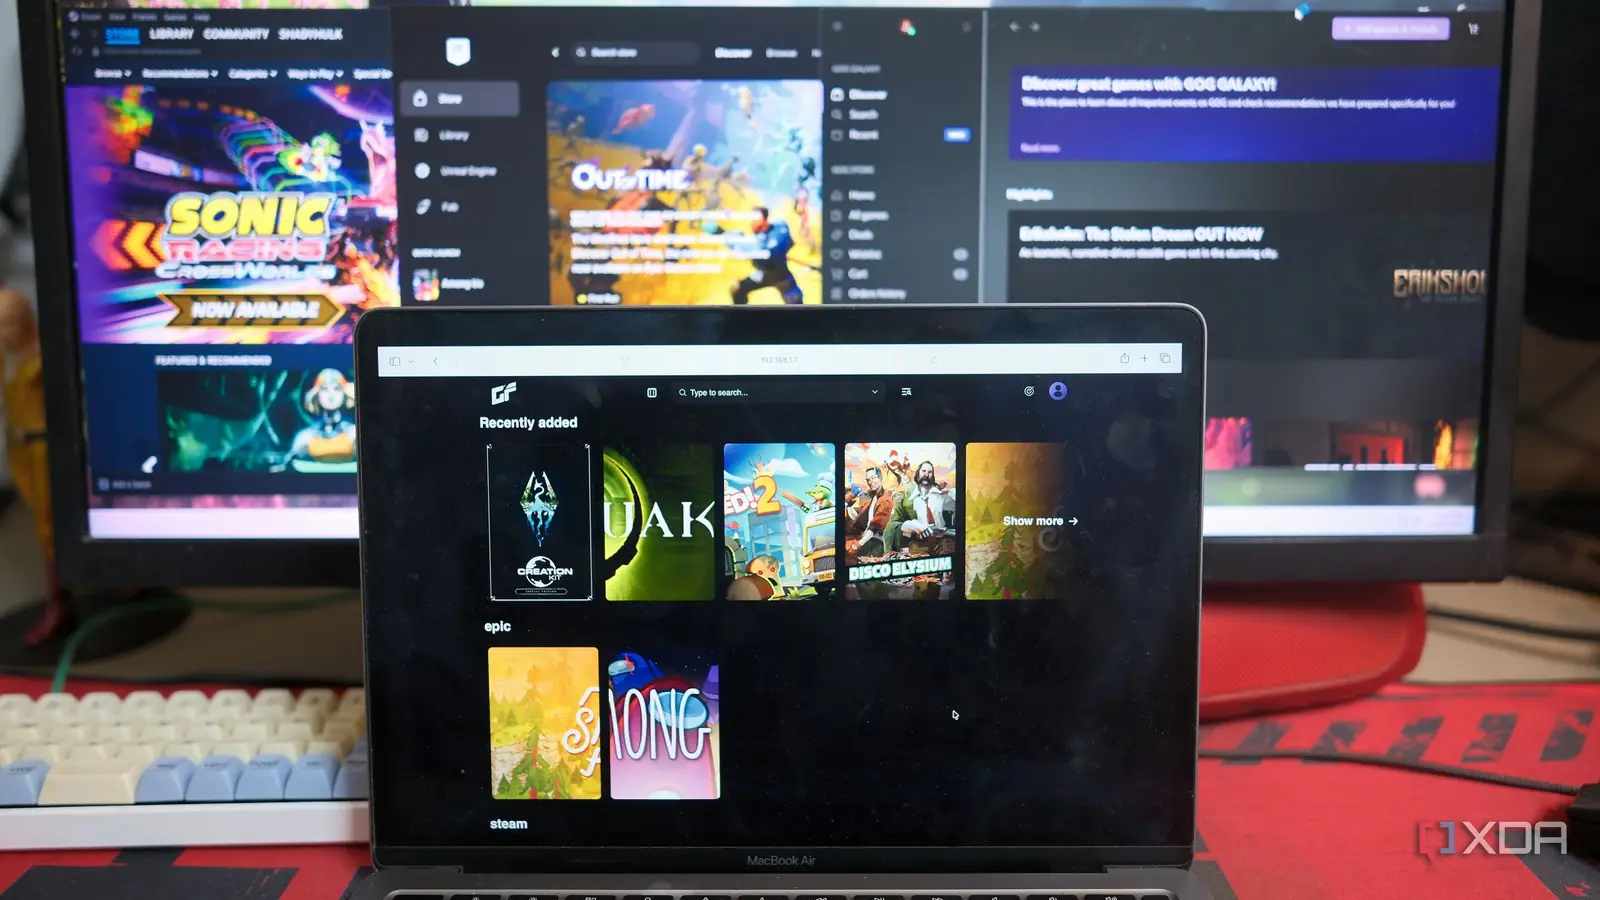
Gameyfin scans your game libraries and presents the available titles that are visible in a web browser. Since you have to own all the titles, Gameyfin works like Jellyfin for digital games, allowing you to access the available games you’ve installed on your machines.
What does Gameyfin have to do with games?
A game library management with a no-nonsense UI
Your game library may feature across different storefronts, such as Steam, Epic Games, and GOG Galaxy. Hence, it is tedious to install each game distribution software on every machine and authenticate it with 2FA to let anyone play. Besides, you don’t want to expose kids or anyone to a library with a lot of mature games. Gameyfin can work for you if you plan to share select, DRM-free games.
Gameyfin acts as a game library manager with a frontend to browse through the titles you own and manage them. You can organize games from Steam, Epic Games, GOG Games, and other sources that you install on your PC, Mac, Linux machine, or NAS into a single browser window. From Gameyfin’s interface, you can add game libraries, and when the cards of installed games appear, you can either download them directly or use torrents to install them on other machines. Do note that it works mainly with DRM-free games.
Deploying a Gameyfin Server
Can work on Windows, Linux, or macOS
Since Gameyfin is available as a Docker container, it’ll work on Linux, Windows, and macOS with Docker. That frees you from installing any application and its dependencies on your computer. First, you need to generate an App Key using the command:
openssl rand -base64 32
Next, copy the output of that command and paste it next to the app_key value in the Docker compose file. You can copy the code for the docker-compose.yaml file from Gameyfin’s documentation.
Here’s the docker-compose.yaml for the Gameyfin container installation in my home lab:
services:
gameyfin:
image: ghcr.io/gameyfin/gameyfin:2
container_name: gameyfin
restart: unless-stopped
environment:
APP_KEY:
– “./db:/opt/gameyfin/db”
– “./data:/opt/gameyfin/data”
– “./logs:/opt/gameyfin/logs”
– “/media/steam:/opt/gameyfin/library/steam”
– “/media/epic:/opt/gameyfin/library/epic”
– “/media/gog:/opt/gameyfin/library/gog”
ports:
– “8080:8080”
Pay close attention to the Library Folders section; otherwise, your games won’t appear on Gameyfin’s dashboard. The path of the game library folder depends on where you’re deploying the app’s container.
For example, I deployed the Gameyfin container on a Linux VM running on Proxmox, and had to map the game library shares from my Windows 11 desktop. So, I shared the exact folder where I had installed all the games and enabled proper sharing with read-only permissions from Windows 11. The Steam’s library folder path for my desktop was C:\Program Files (x86)\Steam\steamapps\common. Similarly, I used the C:\Program Files\Epic Games path for the Epic Games library.
If you are using another partition, drive, or a NAS to install and store your games, you’ll need to use that exact path to those game folders via the game service. For those using Windows or macOS shares, you can mount these shares if you’re running Gameyfin’s container on Linux. I used the following command to mount the exact game library folder paths:
sudo mount -t cifs //BATPC/SteamLibrary /media/steam -o username=WindowsUsername,password=WindowsUserPassword,uid=1000,gid=1000,file_mode=0777,dir_mode=0777
Note the space between the two paths, since the second is the absolute path where you want to mount your game library share. Similarly, you’ll need to find the shared folder path for Epic Games, GOG Galaxy, and other game libraries that you wish to map using the above command.
If port 8080 is already in use by another app, change the port on the left side of the colon (e.g., 8088:8080). That way, you won’t run into port conflicts when deploying the Gameyfin container.
Save the YAML file and run the sudo docker compose up -d command to start the container in detached mode. After that, you can follow the setup process from the browser using the machine’s IP and port on which the Gameyfin container runs.
Configuring the libraries and plugins in Gameyfin
Mapping correct folders and pulling metadata for games
You can enable Single Sign-on with an open-source identity provider, such as Authentik or Pocket-ID, from the SSO configuration under the Administration section in Profile. Under the Libraries section, grant sufficient permissions to allow Gameyfin to scan the mapped libraries. Then, add the Libraries for the game services you want to map, such as Steam, Epic Games, and others. After providing a directory name, make sure you select the exact folder corresponding to the respective library. For instance, choose /opt/gameyfin/library/epic for the game library of Epic Games linked as it appears in the Docker Compose file. Ensure you configure, enable, and use the IGDB metadata plugin to ensure the names and covers of your games appear correctly.
Building a browseable game library server with Gameyfin
Since Gameyfin primarily works with DRM-free games, it does not support console platforms such as PlayStation, Xbox, or Nintendo. With this app, you won’t have to share your DRM-free games without giving away login details from Steam, Epic Games, GOG Galaxy, or others. That’s why Gameyfin is an exciting project that works similarly to Jellyfin, but for games. It liberates you from game storefronts and launchers, allowing you to organize and share your games with ease. It already has some cool features and will continue to improve as the community grows. Gameyfin is undoubtedly worth checking out for your game library management.