Copyright XDA Developers
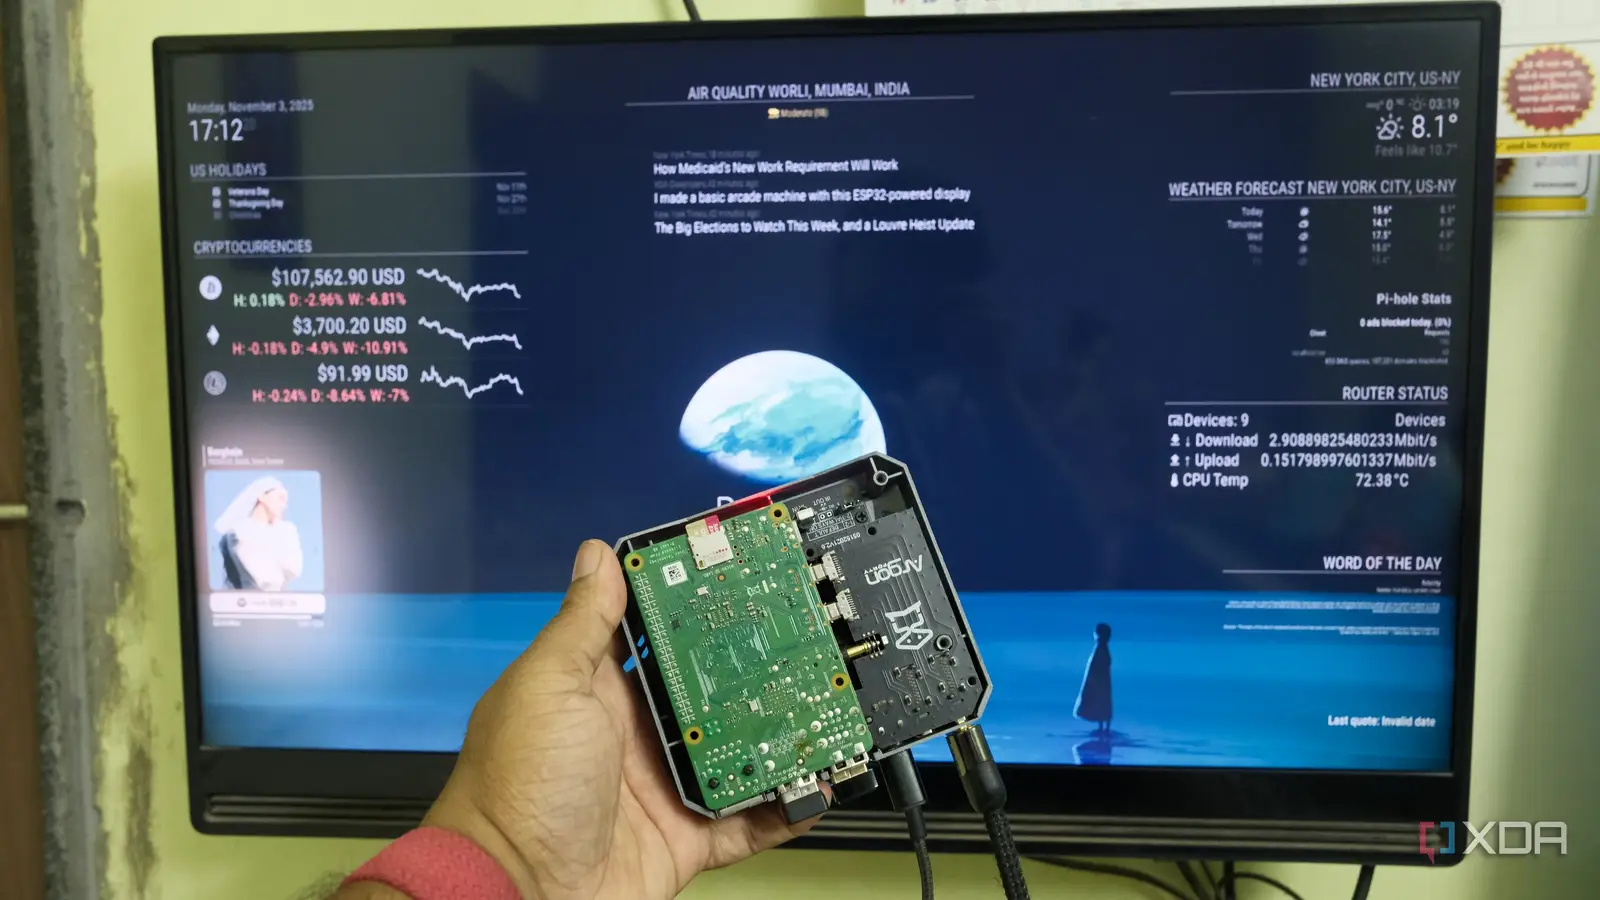
Setting up a smart home is a rabbit hole, and I happily tumbled down that one. Over the past years, I have experimented with Home Assistant, ESPHome, and various other IoT projects on my Raspberry Pi. Along the way, I realized that a lot of my gear was collecting dust, like my old Samsung K5100 Series 5 TV. After reviving some smart home devices, I decided to give my old TV a new purpose. After exploring a few options, I turned my decade-old TV into a smart dashboard. For that, I chose MagicMirror, an open-source project best known for its DIY smart mirrors. Here’s how my project of making my old TV into a smart dashboard with a Pi came together, the mistakes I made, and what I learned from it. Selecting a viable software to run on the Pi over an old TV Your choices are either DIY experiments or pay for it When building a smart dashboard for my old TV, I faced an apparent dilemma — pay for a service or experiment with hardware and software. DAKboard is a popular option with a sleek interface, but it is cloud-based, limits customization, and requires a subscription. I wanted a more flexible and local solution. I briefly considered Home Assistant. However, my old TV lacks touch input, and I already use HA’s companion app on the family tablet. In came the MagicMirror (MagicMirror2). Many projects prefer using it to build a smart display or mirror in portrait mode. However, I wanted to use it in landscape mode on my TV. This community-driven project is highly customizable and runs on Raspberry Pi models, requiring no special hardware. I set it up on my Raspberry Pi 4B, although it could run even on a Pi Zero 2W. Besides, I didn’t think setting up and maintaining MagicMirror would’ve been that much of a problem. And I couldn’t have been more wrong. Running MagicMirror on the Raspberry Pi 4 had some hurdles that were not present in any guides. Hurdles of running MagicMirror on Raspberry Pi Getting compatible libraries on board What felt like a simple git clone quickly turned out to be a multi-course buffet of challenges. MagicMirror needs Node.js as the runtime environment, as mentioned on the official documentation page. After installing Node.js, my Pi 4 took around six minutes to install MagicMirror, as my Pi OS only had the bundled desktop apps. All ran fine until I wanted to use some popular MagicMirror modules. The MagicMirror console kept throwing a module export error with every possible module I ran. On referring to the official MagicMirror forum, the community members recommended using a specific version of Node.js. Downgrading to Node.js v22.18 resolved the issues, and I stopped receiving errors in the MagicMirror’s console. Additionally, I set up a Code Server on my Pi, as I wanted to easily SSH remotely into the Pi to edit MagicMirror’s configuration and modules directly from the browser. That made it a lot easier to work with the files and tweak them. Selecting and customizing modules for a smart dashboard Picking the ones that work is tricky MagicMirror’s biggest strength is the community-developed library of modules. From stocks to Spotify, I found many interesting ones. But getting them to run on my Pi was tricky. While some modules were outdated, some depended on specific Node versions. Instead of using the 1080p TV directly, I connect the Pi to my 4K monitor. That messed up a lot of things. I didn’t want to clutter the large screen with too much information, so I had to rework the selected essential ones for my TV. To make the smart dashboard’s background appealing, I used the BackgroundSlideshow module to cycle through custom images instead of leaving a black screen. Here are the modules that I run on my MagicMirror: AVStock — display live stock updates AirQuality — local air pollution data Cryptocurrency — crypto prices in real-time WordOfTheDay — Building vocabulary OnSpotify — Displays Now-Playing songs HomeAssistant-Sensors — Pull metrics from Home Assistant Pi-hole Stats — Ad block data from Pi-hole Achieving the right readability and fine-tuning the text size to complement the images required some trial and error. That was all part of the fun with distance viewing. A project worthy of going the extra mile