I’ve been using Windows for years, but never paid much attention to the PowerToys toolkit. I assumed it was just a bunch of little tweaks that would end up being more hassle than beneficial. And when it comes to graphics work, PowerToys was certainly the last tool to come to mind — it doesn’t exactly scream “I’ll boost your design workflow.”
But it turned out to be exactly that: a design booster. I realized some of its features feel almost tailor-made for graphics work. From grabbing colors directly from my screen to getting the precise measurements of a button, PowerToys has some hidden gems that can help smooth out the rough edges of creative work. Here are the features I rely on now…
Color Picker
Instantly grab a color
The Color Picker tool is probably the most obvious feature that complements graphic design. The shortcut Win + Shift + C brings up the Color Picker window, then all I have to do is select the Pick tool. I can hover anywhere on my screen and click without triggering an interaction, even on apps, tabs, and buttons. For someone who’s studying UI design, this is incredibly helpful for snatching color palettes from example portfolios or just apps that look good.
The Color Picker supports a ton of color formats. But to keep it real, I only use these:
HEX (#RRGGBB) – The standard for web and digital design. I’ve come to rely on this format for my custom color libraries, but it’s also handy if you’re editing CSS or HTML.
RGB (Red, Green, Blue) – Most image and design editors will let you punch in these RGB values directly.
HSL, HSV, HSB (Hue, Saturation, Lightness/Brightness/Value) – These can be lifesavers when you want to tweak one aspect of a color instead of altering the whole thing. For example, adjusting lightness or darkness without messing up the hue.
CMYK (Cyan, Magenta, Yellow, Black) – You’ll want to use this format when picking colors for anything that’s eventually going to be printed on paper.
The rest of the formats seem more specialized for color science or certain niche rendering systems. They include CIELab, Oklch, NCol, VEC4, and more. It’s nice to know PowerToys can handle them, should I ever step into pro-grade color management.
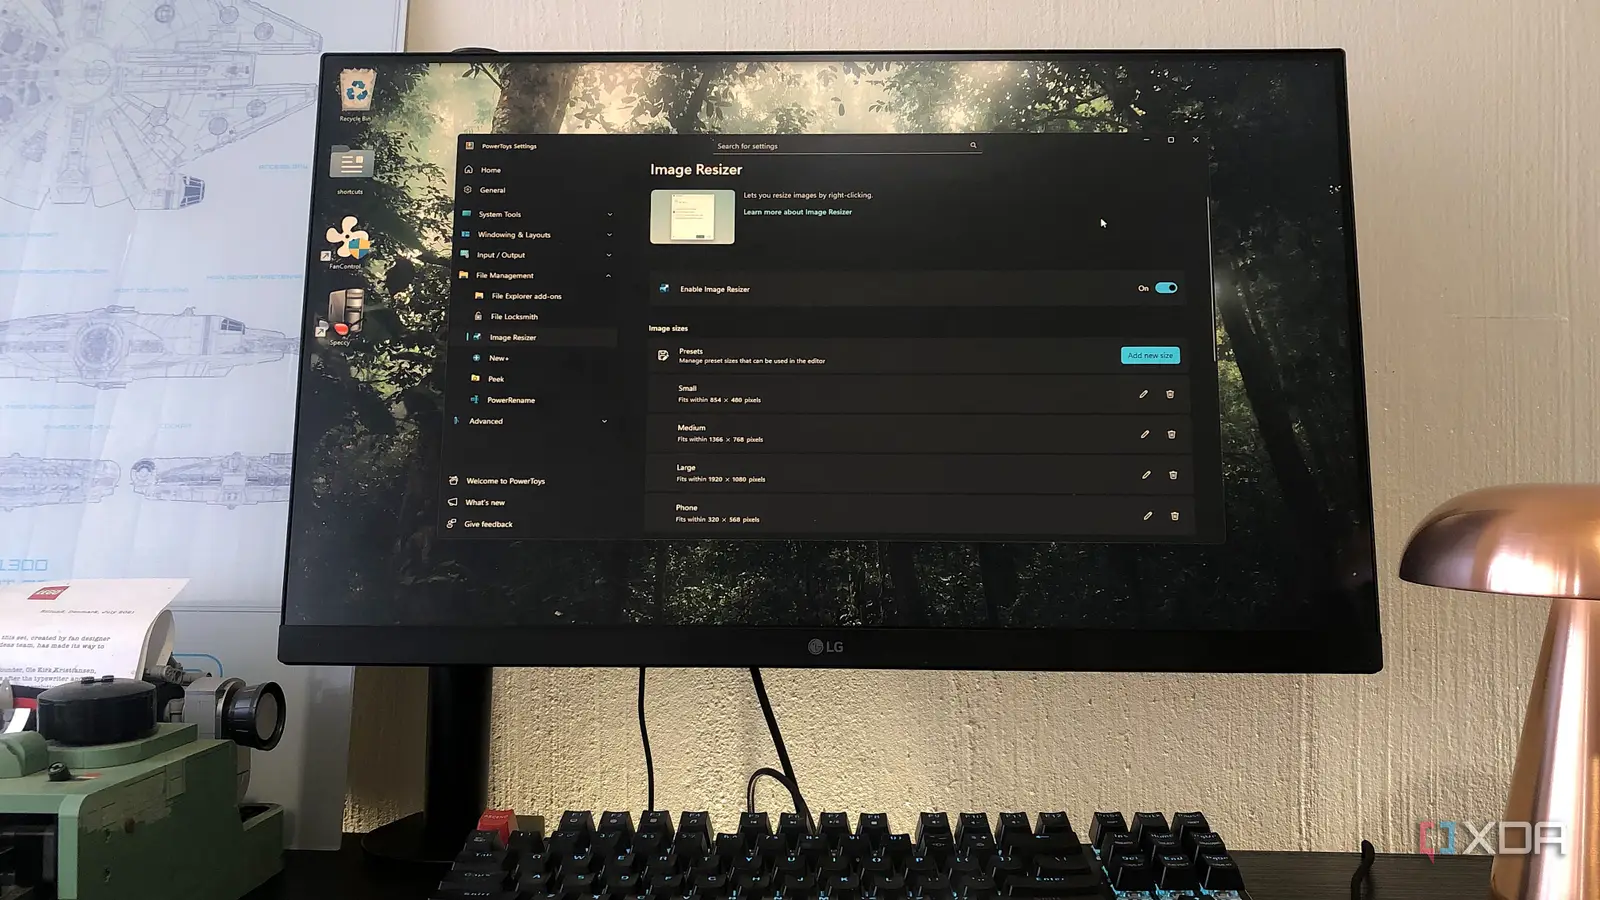
Image Resizer
Batch-resize in seconds
Another PowerToys feature that perfectly complements design work is the Image Resizer. I work with a lot of image assets every day, often within the same project, so all of them need to meet the same standards. Enabling Image Resizer lets me resize my images in batches, right in the Windows folder where they live — all I have to do is multi-select, right-click, and hit Resize with Image Resizer.
The resizer tool gives you all the right customizations. I can add image size presets, tweak the encoding, and adjust the format. There literally couldn’t be an easier way to resize my images; this method beats all the image editors that offer batch resizing.
Quick Accent
A quick way to type accented and special characters
Every now and then, I create text in a language that requires “ô” and “ê”. There are modifier keys you can use on Windows to get accented characters, but they’re too complex for me to remember, so I’d normally just turn to a site like AccentedLetters and copy the letters. PowerToys’ Quick Accent tool completely solved this problem.
All I need to do is hold the key, hit Spacebar, and a list of the letter’s corresponding accents will pop up at the top. I use the arrow keys to navigate through them, then let go of the key. This works seamlessly in every graphics app I use, despite the apps themselves not having accented or special characters.
And, of course, PowerToys lets you customize this tool — the activation key, the position of the toolbar, sorting the characters by usage frequency, and the language sets with accented characters.
Screen Ruler
Quickly measure the pixels on my screen
Most of my graphics software already have advanced rulers, grids, and snapping features. So at first glance, PowerToys’ Screen Ruler seemed redundant. Plus, it only measures what’s rendered on my screen, so things like zoom level and screen size would affect the numbers. But there are a couple of scenarios where Screen Ruler actually ended up making sense.
Firstly: sanity check. When something seems visually off in my design, despite all the numbers technically adding up, the Screen Ruler enables me to quickly confirm alignment or size because it measures by pixel. It also helps me get a general sense of alignment and sizing from my design resources and examples, and then I can use those relative comparisons as the foundations for my own graphics.
Screen Ruler comes with a couple of customizations like unit of measurement, line color, line feet, and pixel tolerance for edge detection.
An overlooked design booster on Windows
PowerToys isn’t a design suite, but that’s exactly the point; I simply use it to plug the gaps. Instead of downloading a bunch of random apps to help with minor tasks like color picking and measurement, I’ve got the functions living right on my computer, just a few shortcuts away. If you do any kind of design, image editing, or graphics work on Windows, it’s worth firing up PowerToys and seeing which of these features make your life easier.