Finding Hollow Knight: Silksong’s craftmetal locations might not be essential, but if you want some of the game’s best tools, like the Cogfly, it’s more than worth the hassle. The most powerful tools require craftmetal, and Silksong isn’t exactly forthcoming with this particular collectible.
We’ve listed all Silksong craftmetal locations below and explained how to reach them. If you need help getting your bearings, keep our Silksong interactive map handy for easy reference
All Silksong craftmetal locations
Silksong has eight pieces of craftmetal tucked away in out-of-the-way tunnels across a handful of regions. Some of them require late-game abilities, such as the Faydown Cloak, to obtain, though you can get most of them without anything fancy. Strong and late-game tools, including all the ones you get from the Twelfth Architect in the Underworks, require a chunk of craftmetal along with the rosary bead fee, so make sure you’ve got some on hand before going shopping.
Bone Bottom craftmetal
You can purchase a chunk of craftmetal from Pebb, the merchant next to Bone Bottom’s Bellway station, for 60 rosary beads.
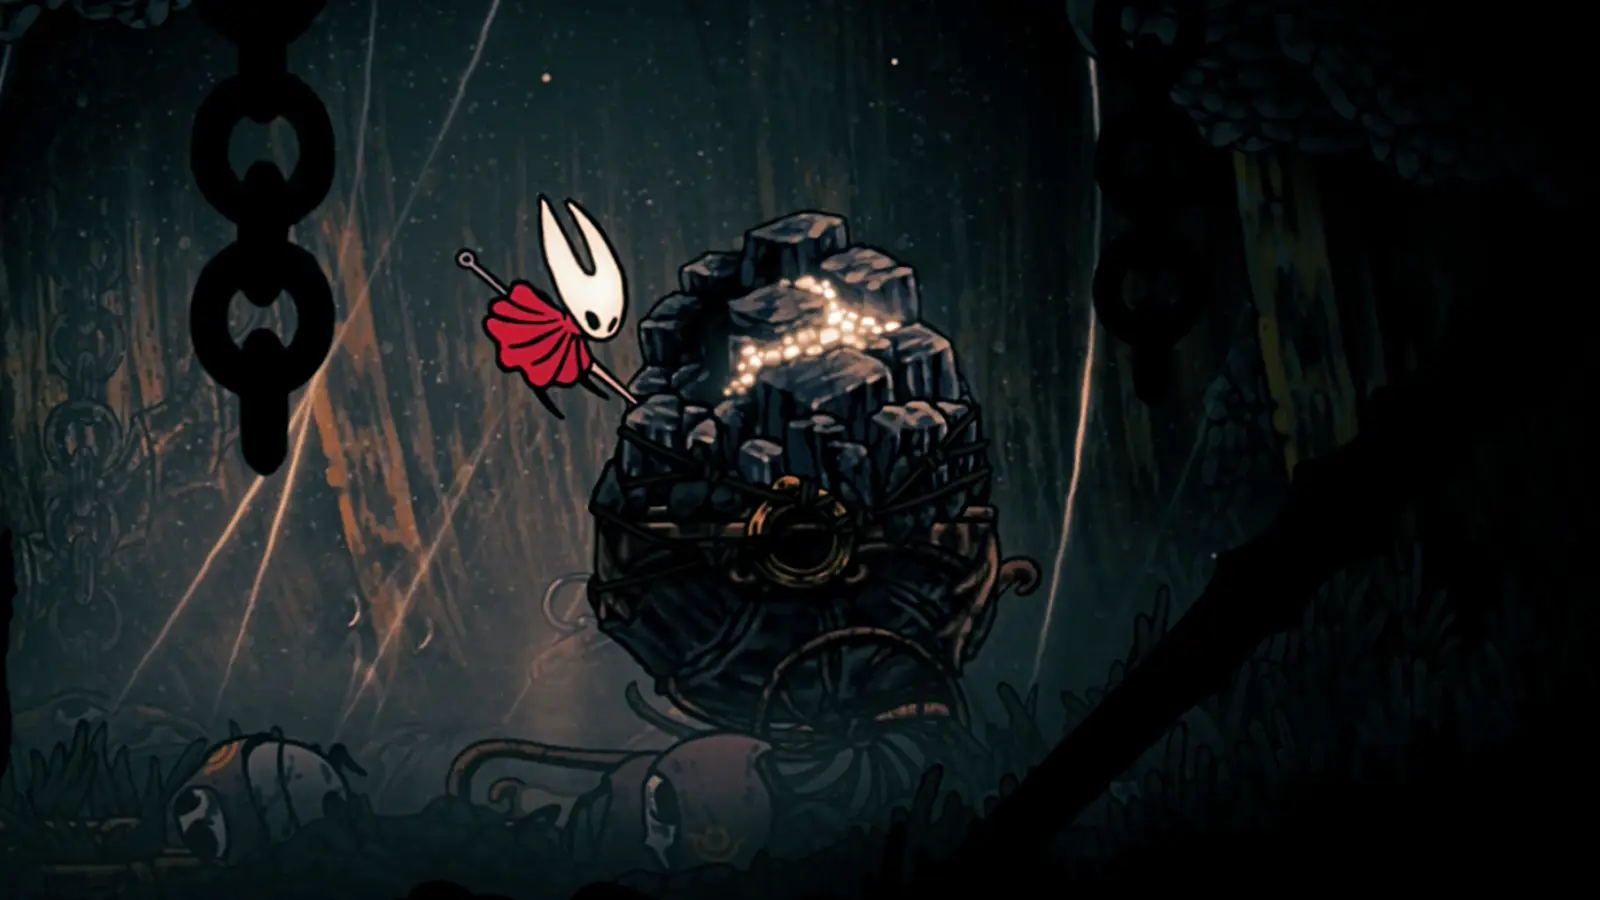
The Marrow craftmetal
Once you reach the chamber shown above in The Marrow, destroy the glowing spot on the wall below the red flowers to open a passageway. Follow it to the end (carefully, as there’s a spike pit at the bottom), and grab the metal at the end of the tunnel.
Deep Docks craftmetal
Enter Deep Docks via the lower Far Fields entrance, and instead of dropping down to collect the spool fragment (though if you have the Faydown Cloak and Clawline, you should go ahead and get that), go to the left. Smash the wooden supports under the platform to clear the way, enter the next chamber, and get the metal from the chest inside. A flying enemy throwing explosives will follow you in, so don’t let your guard down.
Blasted Steps craftmetal
This piece of craftmetal is underground in a little tunnel system. It’s accessible via a narrow shaft under the first bell in the last pogo challenge before reaching Last Judge. Use the Drifter’s Cloak to hover safely down, avoiding the sand — and Sandcarver worms — as you go. Make your way to the left to find the metal.
Underworks craftmetal
You’ll need to defeat Trobbio and use the Whispering Vaults elevator to the Underworks to reach this part or enter via Whiteward, as there’s no other path to this side of the Underworks yet. Once you get the metal, a few undercranks — the area’s giant enemies with large shells — will attack, so make sure you’re ready.
Since the Underworks’ craftmetal is situated in the middle of a route full of platforming challenges with no easy way back, the ideal time to get it is on your way to getting the Clawline, since the ability is in the room above the craftmetal. If not, and you don’t want to go through the Clawline room again, we recommend opening the pause menu, then choosing to save and exit to the main menu. You’ll start back at the last bench where you rested.
Songclave craftmetal
After you complete “The Wandering Merchant” wish and find Jubilana the first time, you’ll need to donate 500 rosary beads to Songclave for the “Strengthening Songclave” wish. Rest, leave, and return, and you’ll see Jubilana goes missing again. Accept “The Lost Merchant” wish from the Songclave wish board, and then find her in Memorium. Once she’s back in Songclave, she’ll sell you a hunk of craftmetal for 180 rosary beads.
Wisp Thicket craftmetal
You’ll need the Clawline and Faydown Cloak to access Wisp Thicket. Climb the tower next to the Halfway House, head out via the top left exit, and make your way across the spikes. At the far left end, use the Faydown Cloak to double-jump into the vertical passage, and follow it into Wisp Thicket.
Once you’re there, go right across the spikes initially and enter the next chamber to unlock the bench as a resting point. Return to the previous room, go back across the spikes, and head left into the next area. You’ll encounter a burning bug who launches homing fireballs at you, though you’re free to just ignore it and dash past. Once you reach the water, deal with the wisp-spewing lanterns. Hop up the platform, enter the secret entrance in the top left, and then go right. The craftmetal is at the far end of the corridor.
Putrified Ducts craftmetal
The road to this piece of craftmetal takes you in the opposite direction you traveled for the “Broodfeast” quest. Enter the Putrified Ducts, drop down the shaft outside the room with the Bellway station, and then go right. You’ll need to travel across a hellscape of poison, ductsuckers (the giant enemies that disappear into the floor), and the plants that grab you with tendrils.
The next chamber is rather safer, and it even has clean water. This is where the flea caravan will eventually end up once you move them on from the Blasted Steps, but until then, it’s completely empty. Climb up the wall at the far end, and you’ll see the craftmetal node tucked into a little alcove.
Looking for more Silksong help? Check out our essential beginner tips and top rosary bead farming locations if you’re just getting started, and if you’re running up against a few locked doors, our simple key locations guide is the one for you.